I want to introduce to all you Rubbish fans a inspiration and a one of a kind Etsy shop.
This is Bella and in her shop, she sells handmade wire wrapped and one of a kind jewelry. One of the amazing aspects of her shop (Along with her beautiful Jewelry) is that she is only 13. You could never tell with her strong presence on Etsy,she is a professional and I can tell this is just the beginning for her.
Read more of her story below....
Here is a little about Bella and her Etsy Shop!
We wanted to know a little more about Bella and what got her started so here are the questions we asked and her responses,
What inspires you to do
what you do?
"I love to do
creative things, from drawing to making jewelry. I love to see a piece of wire
and a bead turn into a beautiful piece of jewelry!"
If someone was to ask
you, “Tell me all about your story, your life,” what would you
tell them? "I’m 13 and ever since I was a little girl I would make
jewelry. When I was 11 my family went to North
Carolina, we went to a shop in the mountains that
sold wire wrapped rings. I loved them and wanted to buy one but, I couldn’t
find one I absolutely loved. So my mom
said to me “you could probably learn how to make these yourself”. So that’s
what I did. I taught myself how to make the jewelry. I opened my shop October
16 2012. "
What is your driving
force...I know these questions may sound similar, but I really need
you to dig deep and get personal with your stories that will be
visible for your potential customers to read and comprehend.
"I love it
when I see people wearing and enjoying my jewelry. I just love to create! "
If you were to have a
brick and mortar shop (physical location), and a customer walked in
while you were there, what would you tell them about your featured
product(s) and/or product line?
"I have wire
wrapped rings and pendants, made out of 20 gauge silver/gold wire with a
colorful bead. I have colors from blue to red and green to purple. I have many
shapes and sizes for everyone and I make custom orders! Soon I will have more
products such as earrings and bracelets."
Why should customers buy
from you rather than from anyone else...what makes your product and
shop unique, maybe you do it differently or use different materials
to achieve the same look, or anything that sets your work apart?
"My Rings and
Pendants are made to last and if anyone finds a problem with anything I will do
whatever I can to fix it."
When did you start doing
what you do? Did it start as a hobby and move into professionalism?
"Well like I
said before I love to make jewelry so it was a hobby for me. My grandma sold
crocheted items on Etsy, and I thought what if I could sell on Etsy. So I asked
my mom and she thought it was a great idea, So now I sell on Etsy."
Who taught you how to do
what you do? Self taught...that's fine, tell me about your initial
studies into what you do, how long did it take you to learn it and
get where you are with it today? "I’m self
taught, and it took my about 4 days to get really good at making wire wrapped
jewelry. I looked up instructions how to make wire wrapped jewelry and
practiced until I got really good."
What I need you to do,
is think about your shop, if it had a window frontage, what
product(s) would you feature there in the window for all to see, and
how would they be displayed
"I
would have my blue wire
wrapped marble ring, and some other of my most popular ones displayed in a ring
box. "
Here are some images of Bella's beautiful jewelry:
I want to introduce the very first featured shop on Rubbishlove, I hope you take time and read these, I think that it is really cool that in the handmade community that you are not just buying a product you are also meeting a real person and creating friendships. I wanted people to be able to get know who is behind making these wonderful handmade gifts. So everyone, thanks so much for stopping by I want to introduce the Kismet Love collection and here is the story of how Kismet came to be by the wonderful owner her self Shelly!
Shelly's story....
I’m
the proud owner of KISMET LOVE COLLECTION. I decided to start my little
adventure after my son was born a micro-preemie, weighing only 1lb 8 oz. Even
as a tiny little baby he had so much strength and fight in him, he is the
bravest person I know. AJ made me realize that life is too fragile and short to
not take risks and follow your dreams.
This
is why I decided to take my life into my own hands and do something that I
always wanted to do. I’ve been a crafty person ever since I can remember so
when the idea of making bracelets for others came to me, it seemed so natural.
I
really wanted a name that was personal to me. KISMET means destiny; fate, I
truly believe that I was meant to make these items and share them with the
world. I also choose LOVE because I make all my items with love and I’m more
than happy while making my bracelets. COLLECTION means exactly as you see it, a
group of things. So what does KISMET LOVE COLLECTION means to me? It means a
collection of items that I love and was meant do make. I hope you enjoy wearing
my bracelets as much as I enjoy making them.
you can check here Etsy store out for all the details which is listed above.
I want to thank Shelly for letting us talk about her for a bit and, we apperciate her making her wonderful bracelets.
Thanks everyone for reading I hope enjoyed getting to know a handmade artist......and don't forget to buy handmade!!
Are you ready to sit back and enjoy the holidays? I know that it can be a hassle to think about the list of people you need to get gifts for, why not leave the work to me and you can relax and get all thanks!
I am offering a gift set via my store on etsy http://www.etsy.com/shop/RubbishLove
That includes:
-2 handmade customized signs
-gift wrapped separately(or together)
-personalized gift tags with message
All this shipped to your door for 25$!
That is right you can get to handmade holiday gifts ready to put under your tree sent to your door step!
Need more signs...No problem I can accomadate any sign order and will give reduced rate the more you
order....I am just trying to make the holidays a little less stressful
It is finally time for me to conclude this little two part post on how to make money from your new green venture. If you haven't read part 1 you can here!
-What kind of Items can I up-cycle?
-Where to get items to up-cycle
-Inspiration and creating some cool pieces
I will say that I have told just a few people to save items for me to up-cycle and I have ended up with more than I could have ever imagined. I have any area set-up and dedicated to organizing all my materials and it is getting a little out of control. But this is a good thing because it is important for running a business is having yourself stocked up with the items your are selling and well I have plenty of stock!
You have your materials and now you need to start crafting away! I would say make at least 20 items, I know that sounds like a lot but it is really not and if you make a couple things a day you will have what you need in just a weeks time.
After you have made some products you are going to need somewhere to sell everything.
Ok, I am going to share with you my experience with how I went about everything in hopes that you will have better luck when you start.
I started with Etsy.com which is a handmade marketplace and there are some super talented people who sell on Etsy. I listed just a few items at first and I waited and waited, nothing. I listed a few more things....nothing....So I am up to 18 items or was and I actually started selling items when I added more products to my store.
Why is this?
Well the more you have on etsy the more you will show up in a search and become more relevant in a search.
Etsy's listing fee is .20 cents which doesn't sound like a lot, it's not really. But, there advice is to re-list your items daily or every few days to keep it coming up fresh in search. I was re-listing my items daily in hopes of having tons of sales and well it made no difference so I have currently quite re-listing and still have had sales. Re-listing seemed to just drive my bill up really fast and my first sale went entirely to Etsy because of the re-list fee's and the actual transaction fees. I was kinda blah about that but I decided that it was still a step in the right direction.
So here's my conclusion with Etsy, I believe it is a great website to list your items because of it's heavy traffic and that it is extremely easy to navigate. There is a lot of support from fellow Etsians with teams and groups and forums that you can ask anything and get a response quite quickly. You have the option to advertise through Etsy and your account starting at just 3$ a week and it really seems to help. But I think if you choose Etsy I would suggest this to you:
- List 20 items to start
- Get involved with the site: favorite, like and join teams
-Make new items often and list!
-Market yourself to all the social networks this is a great help
There are other options to selling there are other handmade artist marketplaces such as:
I have currently not used any of these other sites and would be interested to know how they work but I am fairly certain that Etsy is still has the most traffic of all these.
Other options are creating online stores through your own website. I am currently setting up a store for my blog through Storeenvy.com there basic options are free and you cant beat that!
Another way to get traffic is having giveaways either through your own blog or through others. etsygiveaways.com will list your giveaway and you will get some amazing results from there blog, I love them:)
Setting up your own blog through blogger is another great way to get the word out, it is a lot of initial work but the hard work will defiantly pay off if you keep it up.
Blogging is one of those things that takes time to get started but can eventually be another source of income for you if you have the time to put one together and take care of it.
There you have it you can setup your own green store with little to know money, and through someone Else's trash you can profit from it. Find your niche create something and stick to it. Stats say that 85% of the worlds population shops online, so the world is literally your oyster so why not take advantage of it!
OK, everbody that is how to get started going green to get some green, If there is more questions please feel free to email me and I would be happy to help and give you some advice from my own personal experience.
Below are the pictured instructions and text to follow as well,
if you don't understand something or have questions please let me know I will
do my best to answer all questions!
Ok so I have seen a lot of these up-cycled plastic bags, where you fuse the plastic bags together with wax paper and an iron, my tutorial starts after the actual fusing of the plastic bags so here is a tutorial for that here if you need it!
So lets add our own flair!!
Here are the steps that follow the pics have fun :)
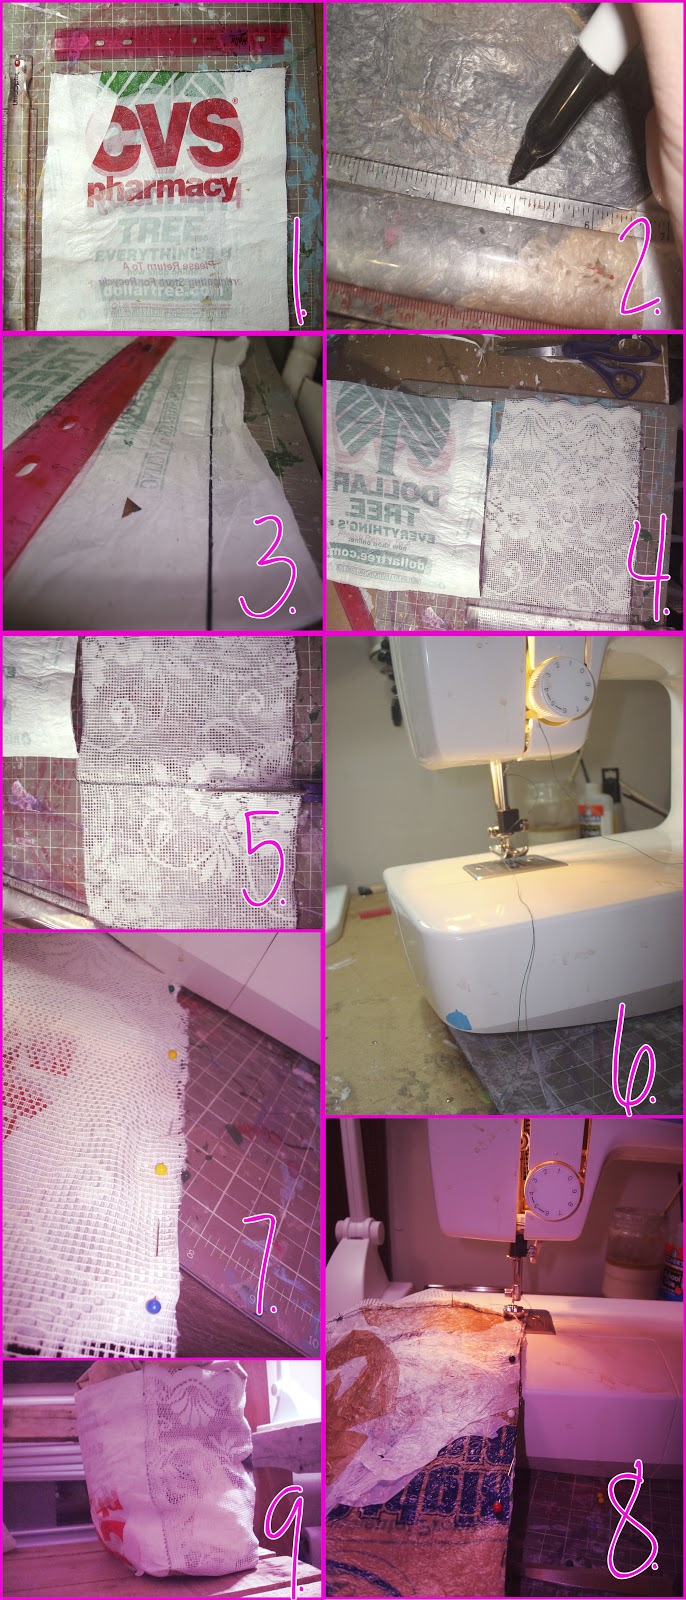
1. I have fused my bags together and made sure that the edges are straight, ( I dont have an actual size because it could vary with your plastice bag fusing), but you do need:
-2 pieces that are the same size for the sides of the bag
- 1 piece for the bottom that is the same lenght as the two side pieces but
not as wide
2. measureing all sides to make sure the are even and matching up to one another
3.&4. I am adding lace to the sides
to give it some pretty flair and I am measuring the sides of the plastic bags
5. I am measuring my lace to fit the sides of my bag and then cutting to match
6. Lets Sew!
7. using my pins to mark put together the sides and the bottom
8. sew all sides together inside out
9. Flip bag out, and you have your self a cute little basket...add straps and you have a pretty little up-cycled bag!
I hope you enjoy all this tutorial I will be making more and I will update you on my newest upcycled bags!!
The other day I received in the mail the most charming little bracelets from the Kismet Love Collection.
Shelly, a fellow Etsian, is the designer of this delightful little accessories and has a beautiful store on the Etsy site. She creates and designs these simple yet elegant little colorful bracelets and has a wonderful purpose to why she has embarked on this journey, on her about page. Her Mission is clear and that is live and love and that is what has inspired her to create!
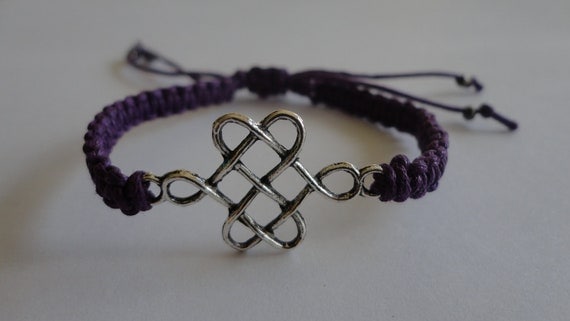
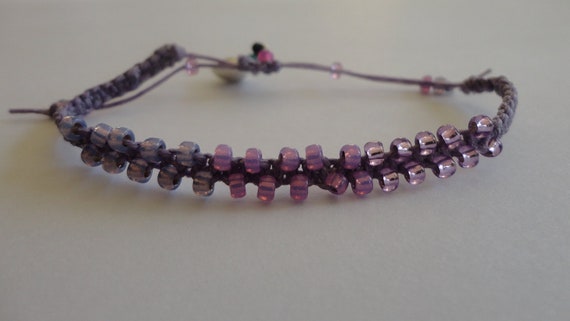
I received 6 of the bracelet: 1.Make a Wish "Dainty Grey Bracelet with Love charm" 2.Make a Wish "Dainty Blue Bracelet with Bronze Heart"
3.Make a Wish "Red Dainty Bracelet with LOVE charm" 4.Make a Wish "Dainty Bow Bracelet" 5. Baby Blue Macrame Bracelet with Silver Bar
6. purple Ombre Beaded Macrame Bracelet
I will say that I love them all I had a hard time chooseing which ones I wanted, and once I received them they where even more lovely in person. These little bracelets would make great holiday gifts and with prices from $2-7 dollars you can afford to get yourself one to!
If you want more information about the kismet love collection stop by her store!
I also posted some photos below so you can see them, I love them I wear them everyday!
I hope you enjoy!! Talk to everyone soon! <3 Shana
I decided last night that I wanted to make journals, So I began look far and wide for the best tutorials and so I did I rounded up some of the best tutorials for journal making.....
1.This is from blog Henry happened 5 Diy journals
Ok, so you don’t have to be a world traveler to enjoy
today’s post. Wherever you go this summer (did anyone make it to the
Olympics?), these travel journals will keep you inspired. I’m working on
my own travel journal right now! I particularly love #2 because I am a
big fan of miniature things, especially paper crafts. Making mini
projects means I use less of my prized paper goodies and can enjoy them
longer. Which journal style are you drawn to?
2.This is a short video on a fathers day mini album but it teaches you a great way bind!
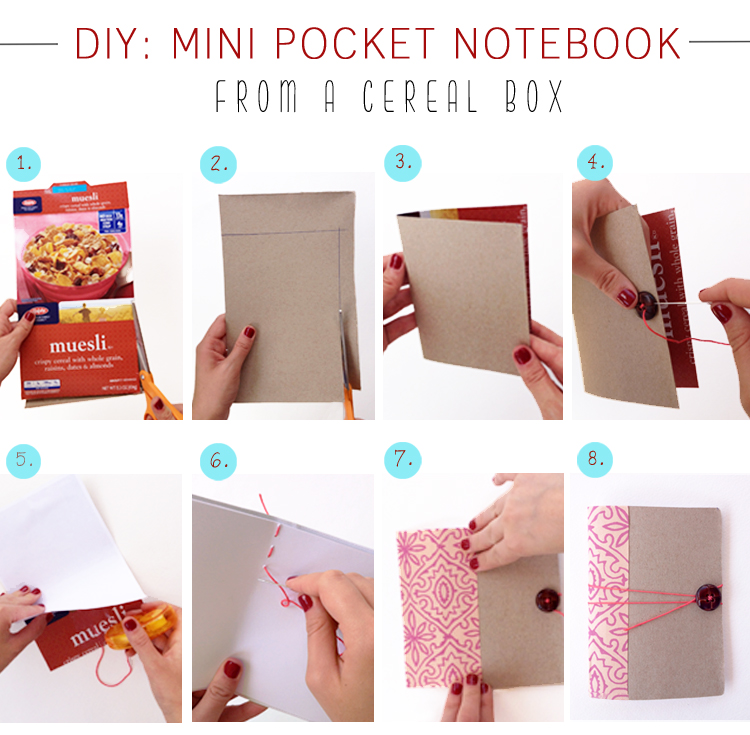
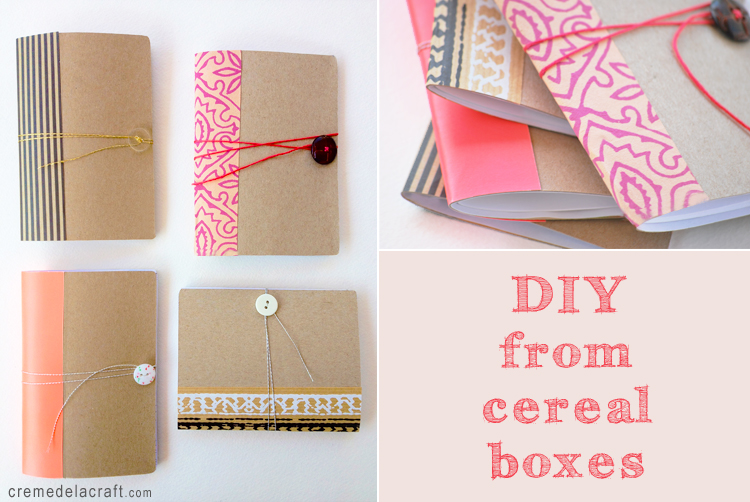
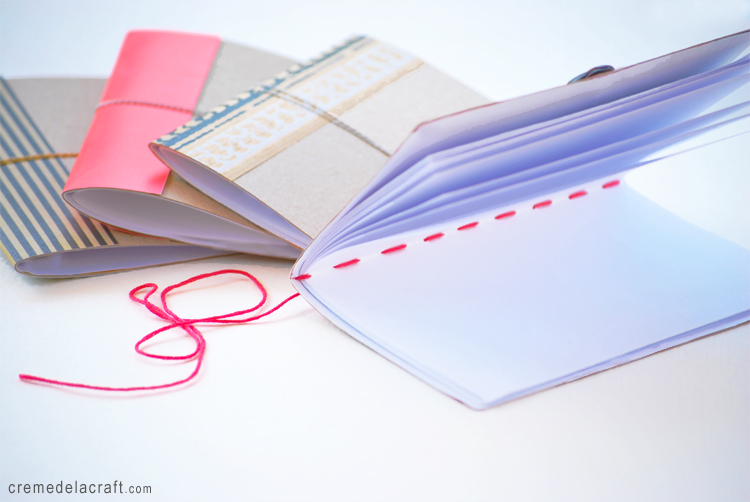
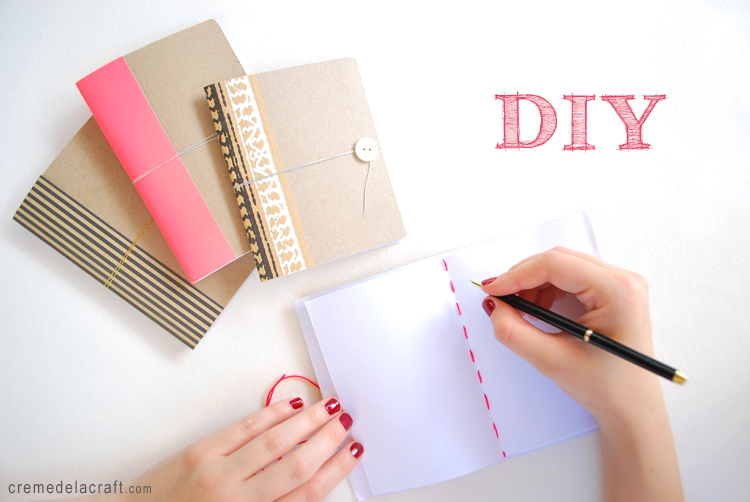
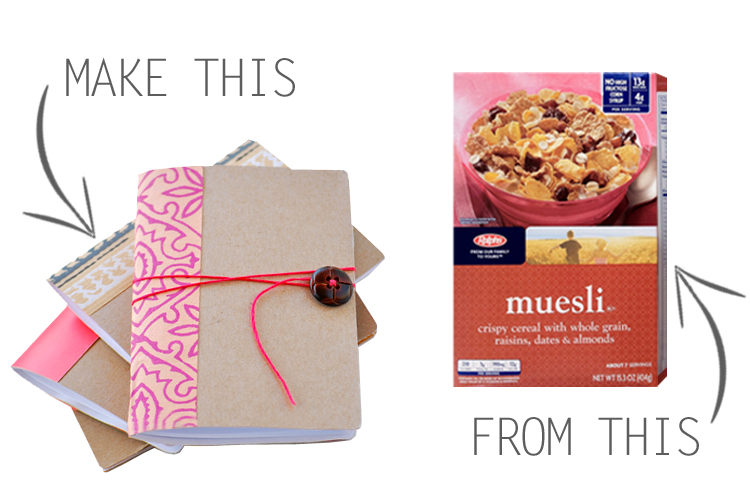
3.Creme de Craft blog, this is a great tutorial on taking a cereal box and turning into a journal...
I am still a little old-fashioned when it comes to taking notes and I
usually have at least two pocket notebooks in my purse at all times (one
for craft ideas and the other for making to do lists). I realized that I
am also very picky when it comes to choosing the perfect notebook, and
for those of you who are like me, I've got a solution for you!
Follow the directions below to make your own personalized,
budget-friendly pocket journal out of cereal boxes inspired by my
favorite Moleskine
notebooks. Choose your favorite decorative paper and a stylish button
to create the perfect notebook that suits your own style. These were so
easy and fun to make, I ended up making four...one for me and three for
my friends.
Materials:
• Cereal box (1 cereal box makes 2 notebooks. You can also use cardboard, cardstock or gift boxes)
• Paper for the inside pages (I used 20 pieces of 8.5" x 11" computer paper, but you can also use lined or graph paper)
• A piece of decorative paper (to cover the spine)
• Scissors
• Ruler
• Pen
• Glue stick, tape runner or double-sided tape
• Needle and embroidery floss
• Button
Steps:
• Cut out the cereal box to create the cover for your notebook. I cut a
5.5" x 8" piece for mine, but you can make it as small or large as you
wish.
• Fold it in half so that the blank side is facing out.
• Run embroidery floss through the needle and sew on the button to the
front of the notebook. Leave about 20" of the thread hanging. This will
be used to wrap around the notebook to close.
• To cover the images of the cereal box, apply glue or tape to the
inside of the notebook (make sure you get the corners!) and place a
piece of paper on top to attach. Cut around the edges to remove any
excess paper.
• Grab your paper for the inside pages and trim them down so they are
slightly smaller than the notebook (about 1/4" shorter on all sides).
• With the needle and embroidery floss, stitch the paper to the notebook down the spine.
• Apply glue or tape to your decorative paper and attach it to the spine of the notebook.
• Optional: For a more finished look, cut rounded corners on all four edges of the notebook.
Follow along on Facebook and Twitter to keep up with my new DIY projects each week!
4. making a super cute little journal super fast!
5. Simple as that blog DIY pocket travel journal
01
DIY pocket travel journal
Well, I'm officially on my way to Queensland
tomorrow and I can't even tell you how excited I am to get there! It's
sure to be a memorable trip and to keep a record of my travels I created
this quick + simple pocket travel journal.
The pages are blank - ready to be filled with journaling, memorabilia
and when I get home - photos. Since its a long trip and I'm packing as
light as I can I didn't want to take anything too bulky, so this little
journal is perfect. Created using a small notebook from the dollar store
+ various scrapbook supplies, the journal measures 3.5" X 5.5" and all I
need to keep it up to date on the trip fits neatly inside a regular
ziplok bag.
I'm excited to get to work on filling it with memories from my trip to Australia.
When I get home I'll be sharing images of the completed album along
with more detailed instructions on how to make your own. You can see the
complete supply list for the album below.
6. Poppy talk handmade, craft bookbinding
I used to shoot weddings, and my partner and I would also make the
albums for our clients. We used the "stab-stitch" method. I've since
picked up a book called "How To Make Books" by Esther K. Smith, to pick
up some other methods. My niece wanted to make some books to give her
friends when she goes back to school, so I chose a simple stitch and
gathered up some bits of paper and cardboard that I had laying around.
Here we go...
The materials used for this little book. Everyone seems to have left-over bits of paper, so rather than toss out, make a book!
Tools
used for this project. A paper punch (to create circles), needle, awl,
bone folder, bulldog clips, exacto blade, scissors, and a ruler.
Cut and fold paper and cardboard to the size you want the book to be. Burnish the folds with a bone folder.
After
scoring the back side of both the front and back covers (about 3/4"
from side), clip all pages and covers with bulldog clips. Use some paper
to pad the bulldog clips to prevent dents in cardboard.
For a 5"x7" book punch three holes with the awl: one in the centre and one on each end about 1" in.
Using
book binding thread or a sturdy cord or ribbon, start stitching. I used
a stitch very similar to what I did with wedding albums. It's pretty
easy, but you really can come up with many different patterns. Try it
out!
Cut out shapes with your scrap paper. We made some simple birds and circles. Glue stick was used to attach cut-outs to cover.
My
niece wanted a place for "secret messages and stickers", so I made an
envelope for the inside back cover. Every girl should have a safe place
for secret messages and stickers!
You can do so much with a few bits of scrap paper and some book binding tools. Have fun!
7.Judy Wise, Making a journal from a paper bag
A
few days ago I promised you a tutorial on making a journal out of used
grocery bags which I think are a great material to recycle. Well, here
we go. First you carefully open the seams of the grocery bags. (or you
can just rip them open like I did)
Tear
them to size. My size was 10" x 15 1/2 ". They'll be folded in half. I
got 3 sheets that size out of each bag so it took 6 bags to make the
journal.
Next I soaked each sheet in water and squeezed it out. Then I hung the sheets on a rod in my studio to dry.
Next I ironed out each sheet with a little spray and my iron.
Here are all the sheets folded and stacked into 3 signatures of 6 each.
After
sewing the signatures in a coptic stitch (there are many tutorials on
that online. Just google "coptic stitch" and choose one) ---
I
cut a sheet of tarleton (use whatever you have. Fabric, cheesecloth - I
happen to have tarleton because I'm a printmaker but I would have used
anything else that presented itself equally) - anyhow, cut a piece of
something and get a sheet of cardboard to fashion a spine so you'll know
which end of the book is which.
Here is the spine cut out. Dont measure. This isn't that kind of a book.
Slather gel this way and that until the spine is roughly in the spinal area and the fabric is glued to the cover.
Let it dry. It's gonna be a wet puppy.
Ta
Da! You now have a floppy, friendly, fabulous book in which to gather
up all your ideas and flotsam. Throw it in your purse, let your friends
draw in it, do anything but treat it like it's a big deal. This journal
is just for sloppiness. (come to the wild side!!) 8.Crash notes Diy quick hand bound mini journals
quick hand bound mini journals: tutorial
A few weeks go, I shared this instagram of some journals I made for my
sister and had a few people ask for a tutorial. Finally, I'm getting
around to doing it! These are really easy and though they may look labor
intense, they can be done really rather quickly (especially if you do a
bunch at a time and have a little assembly line going.)
You really only need a few supplies. Your cover material (I used kraft
cardstock...because you can never go wrong with kraft cardstock.) Your
inside pages (these have 20 pages so you'd need 10 sheets of paper to
cut in half. Recycled or ledger type papers would work great as well!)
If you're doing the peek-a-boo cover like I've done, you'll need some
type of patterned paper or pages torn from a magazine. For these, I used
pages from a yarn catalog. For my sister's set, I used landscape scenes
from an Urban Outfitters catalog - they worked fabulously! To bind the
journal, a needle and thread or embroidery floss.
First, trim your cover to 5.5 x 8.5" and cut your title from the cover. I
made up a set of cover templates for you to download. The file includes
the two shown ("now" and " "to•do") as well as twelve months. The
placement is random (you can kind of see in the photo of my sister's
set) because that's how I like them. If you aren't comfortable with an
exacto, these titles are all chunky enough that they could easily be
done with fine tipped scissors. You can grab the files HERE.
Now trim your inside pages to the same size as your cover. If you want
to get a bit fiddly (totally unnecessary), you can trim them to
different sizes so that when the journal is folded, the paper edges
don't extend past the edge of the cover. For instance, for these
journals, I first cut the 10 sheets in half and then progressively
trimmed off a 1/16" sliver from the edges to the following sizes: (2) 8
1/2 x 5 1/2" (2)
8 7/16 x 5 1/2" (2)
8 3/8 x 5 1/2" (2)
8 5/16 x 5 1/2" (2) 8 1/4 x 5 1/2"
Fold everything and collate your cover, patterned insert and pages together.
Now you need to punch holes to bind the pages. I find the center of the
pages (10" in the photo) with my ruler and position everything on a foam
pad.
Punch the first holes through all of the pages.
Punch four more holes for a total of 5 - each spaced 1" apart from the next.
Thread your needle. I double up the thread before threading the needle so there are a total of four strands.
Using your threaded needle, pass through the top hole (inside or outside
of the journal makes no difference and proceed in the pattern shown.
Wrap the needle around the end of the journal and into the first hole, threading in the opposite pattern of the first pass.
To finish, tie off both ends of the thread with a couple of knots and
trim off the excess. There is surely a neater way to do this but I like
the look of the loose ends and it holds up to regular use well.
Since I did a couple of these journals for the tutorial, I'm happy to
send them to one of you :) Just let me know in the comments if you're
interested in them and I'll choose someone Friday! Here are the
completed journals:
9.talk to me craft soft cover wrap around notebook
How to make a Soft Cover Wrap Around Notebook
I made a tutorial about how to make one of these notebooks.
Things I used:
25 sheets of paper
a paper cutter
a bonef older
a sewing machine
a press
two pieces of scrap board
white glue
paintbrush
two pieces of card stock
plastic vinyl material
an exacto knife
Super 88 spray glue
a decorative button
needle and thread
How it was done:
1.Cut the 25 sheets of paper to 5 x 8 inches. Put them into 5 stacks, with 5 sheets in each stack.
2.Using the bone folder, fold each of the stacks in half.
3.Using the sewing machine on the widest stitch setting, sew down the center of the crease on each of the five plies.
4.This is what each of the piles will look like.
5.Fold the pages in half again and pile them up neatly, with the sewn side facing out.
6.Using
a press, or something to keep the pile of sewn papers together, put an
old board on either side of the pile and insert it all into the press.
7.You can see here the paper clamped inside of the press with the two pieces of scrap board on either side.
8.With a brush, spread a generous amount of glue across the paper. Leave it to dry, and repeat this a few more times.
9.When it's completely dry, you can remove the paper block from the press and carefully remove the two pieces of scrap board.
10.Your paper stacks should be glued securely and have a stiff spine to keep the 5 stacks of sewn paper together.
11.Now
cut two pieces of card stock that measure 5 x 8 inches. Fold them each
in half with the bone folder. These will be the end papers for the book.
12.Take
the vinyl material and cut a 11 by 5.25 inch piece. You are going to
want to cut three small lines into one side oy the vinyl, approximately
in the middle, and about one half of an inch away from each other. This
is going to be where the thin strip to wrap around the entire journal
will be inserted through.
13.Cut a long thin strip of contrasting
vinyl at least 22 inches long. Insert the strip from the bottom into the
first hole, then over and into the second, then back up from the bottom
and leave a little bit sticking out.
14.Take the card stock pieces
you have prepared for the end papers and place them on a covered work
area. Use the spray glue and cover the visible side of the card stock.
Be sure to use the spray glue in a well ventilated area and to cover up
your work area, as this stuff is really sticky and can get all over the
place if you aren't careful.
15.Attach the one of the end papers to
the paper block, making sure the crease in the card stock is in line
with the spine of the paper block. Now attach the other side of the end
paper to the inside of the vinyl piece at the opposite sides of where
you cut the holes and attached the strip.
16.Attach the other end
paper to the other side of the text block and then wrap the vinyl around
the paper block to attach the other side.
17.The cover should
snugly wrap around the paper block. If you have made any mistakes, it is
best to act fast, as the spray glue affixes quickly and can rip the
pages of the paper block if you try to take it apart to re attach the
end papers.
18.You can now either simply glue the little bit of the
vinyl strip sticking out of the hle to the cover, or you can get a
needle and thread an a button and sew the button on the cover, making
sure to go through both the thin vinyl strip and the vinyl cover.
19.You
might want to put a couple heavy books on top of your notebook for a
while to let the spray glue dry and make the cove nice and snug.
20.You just made a soft cover wrap around notebook! Way to go!
10.The The creative place
I've
been trying to decide on what to make my hubby for a Valentine's gift
and decided that I wanted to write more than a letter - so I decided to
make him a mini journal / album / book of things I love about him,
different memories I have of our life together, things like that
(hopefully he won't read this before next weekend ;)). I found this fab tutorial
awhile back about button and string closure and somehow wanted to
incorporate it, thus I came up with this fun journal - it has a vintage
feel - the button and string closure, and a bunch of found papers
inside, including old school writing pages, graph paper and
strategically cut magazine pages. The fun thing about these journals is
you can use them for any occasion- to record a special event, to keep as
a personal journal, to write a note to a friend, many possibilities!
First, gather your supplies:
- Cover paper - cut to 11" x 6"
- Inside pages (however many you prefer- I used 7 sheets) cut to 4.25" x 8"
- 2 eyelets (1/8")
- 11" of baker's twine or string
- 2 paper round die cuts - 1" each
- Eyelet punch (1/8"), eyelet setter, hammer and pad
- Stapler and staples
- Scissors
- Ruler
- Paper scorer (if you don't have one you can use a dull object - like a
bone folder edge, a pen with the top still on, a butter knife- pressing
lightly so as not to rip the paper)
Take your cover sheet and score a line 1.5" in from the right side (see below).
Then score a line 4.75" in from the left side (see below).
Fold your inside pages in half. Now your book cover and pages should look like this:Next,
center one of the paper round die cuts on the outside flap (not sure
how to explain that, lol- see picture below). Using your eyelet punch
and hammer, punch through the die cut and cover sheet at the same time
(hole punched should be in the middle of the die cut). Set one of the
eyelets through this hole. Now,
fold your cover closed and line up the other paper round die cut about
1" from the other die cut you just set. I made pencil marks as a guide
on where to place it once I lined it up. Using the tutorial
over at Erinzam, tie your string or twine around the eyelet (AFTER
punching the 1/8" hole in the die cut paper round and putting it on the
eyelet), set this eyelet and paper round punch where you just made your
pencil marks as a guide. Now
it should look something like this. Trim off the extra string after
setting the eyelet. *EDITED* Ok. So somehow my string ended up on TOP of
the paper round die cut. I think I just got so excited about making it
that I got carried away and forgot to put it UNDER the die cut before
setting it. Haha :) So don't make that mistake ;) Ok,
now you need to attach the inside pages. I don't have a super huge
stapler punch thing, so I had to get creative. So here's a picture to
make you giggle: I stapled the pages to the cover by stapling them to
my bulletin board, pulling the book off gently and then folding the
staple prongs down carefully inside. If you choose to have a bunch of
pages and it's getting all wonky when you try and staple it, you could
try hand sewing it with a needle and embroidery thread. Voila!
A string and button mini journal! Now you can decorate and embellish
the cover (or leave it blank with a simple title).... add pictures,
journaling, mementos. :)I
changed my header up top... still trying to decide if it's too
"busy".... what do you think? Any thoughts or suggestions? *EDITED*
Thank you for the suggestions! I changed it again so that the title was
more legible... still trying to decide. Maybe it will grow on me. :)
So there you go, those are some great journal making tutorials to get started with! I will post what I have made here soon, let me know what cool kind stuff you come up with!!


 The materials used for this little book. Everyone seems to have left-over bits of paper, so rather than toss out, make a book!
 Tools
used for this project. A paper punch (to create circles), needle, awl,
bone folder, bulldog clips, exacto blade, scissors, and a ruler.
Tools
used for this project. A paper punch (to create circles), needle, awl,
bone folder, bulldog clips, exacto blade, scissors, and a ruler. Cut and fold paper and cardboard to the size you want the book to be. Burnish the folds with a bone folder.
 After
scoring the back side of both the front and back covers (about 3/4"
from side), clip all pages and covers with bulldog clips. Use some paper
to pad the bulldog clips to prevent dents in cardboard.
After
scoring the back side of both the front and back covers (about 3/4"
from side), clip all pages and covers with bulldog clips. Use some paper
to pad the bulldog clips to prevent dents in cardboard. For a 5"x7" book punch three holes with the awl: one in the centre and one on each end about 1" in.
 Using
book binding thread or a sturdy cord or ribbon, start stitching. I used
a stitch very similar to what I did with wedding albums. It's pretty
easy, but you really can come up with many different patterns. Try it
out!
Using
book binding thread or a sturdy cord or ribbon, start stitching. I used
a stitch very similar to what I did with wedding albums. It's pretty
easy, but you really can come up with many different patterns. Try it
out!
 My
niece wanted a place for "secret messages and stickers", so I made an
envelope for the inside back cover. Every girl should have a safe place
for secret messages and stickers!
My
niece wanted a place for "secret messages and stickers", so I made an
envelope for the inside back cover. Every girl should have a safe place
for secret messages and stickers! You can do so much with a few bits of scrap paper and some book binding tools. Have fun!