I hope everyone enjoys and, let me know what kinds of tutorials you have tried!!
****Also I am looking for Guest bloggers to write on my Blog, if you are interested please email me
Rubbishlove22@gmail.com
<3 Shana
1. Diy Plant hanger from T-shirt!
2. Revamp those old Flip-flops
3.T-Shirt Backpack
- Materials
-
- T-shirt
- Sharp scissors
- Needle and thread
- Large safety pin
- Clothesline cord, about 6 times the width of the shirt
- 7/16-inch eyelet (or grommet) kit (see tip below)
- Instructions
-
-
Turn the T-shirt inside out, then cut across the shirt from armpit to armpit. You'll need only the bottom section.
-
Use the needle and thread to sew a simple stitch across the shirt, about a half inch in from the cut edge, to seal what will be the bottom of the bag.
-
Turn the shirt right side out. Snip the shirt's hem almost all of the way through (do not cut any stitching) at the midpoint between the two side seams. Attach a large safety pin to one end of the clothesline cord. Feed the cord, safety pin first, through the casing of the hem.
-
Follow the eyelet or grommet kit instructions to add eyelets to the bottom corners of the bag.
-
Thread the ends of the cord through the eyelet holes and double-knot them to secure.
-
- Tips:
- An eyelet or grommet kit can be purchased at craft stores or online for around $15. In a pinch, you can cut the holes with scissors and seal the cut edges with fabric glue, but the result won't be as neat or as sturdy.
Pictures by Lana
------------------------------------Update------------------------------------
Due
to several questions about this tutorial, I decided to post an update
with more detailed steps. You can find the tutorial below:
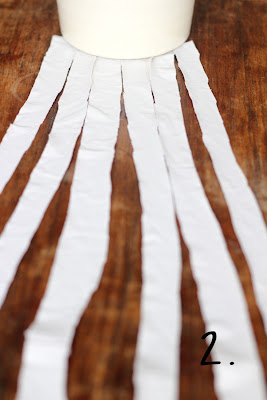
1. Take 6
pieces of fabric, mine are about 45 cm long and 1,5 cm wide. Place
something heavy on the toppart to keep them in place.
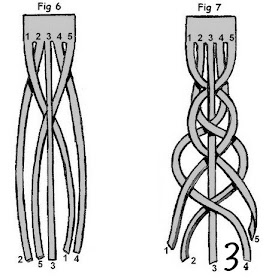
2. Take right strip and follow the red line in the picture.
3. It should look like this.
4. Take the left strip and follow the red line in the picture.
5. It should look like this.
6. Now repeat steps 2 and 4. Pull on them, but not to tight!
7. Keep braiding until you have ure desired length.
8. Get you're glue gun or some textile glue and place a stripe of glue on top of the end. Do this on both sides.
9. Cut the fabric that is on the other side of the glue strip. Not the braided side!
10. It should look like this.
11. Put some glue on the outside of the braid, like shown in the picture.
12. Place the other outside against it and push them together until the glue has dried.
13. Measure the width of youre braid.
14. Cut a piece of fabric. The size should be 2x the width of your braid + 1 cm.
15. Fold the piece of fabric around the part where the bracelet is attached. And glue it together.
All done!
You can of course also sew the bracelet instead of using glue.
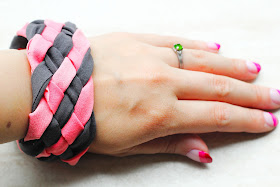
The bracelet will be easy to slide over you're hand, because the fabric is stretchy and soft.

5.Up cycle Bouquet
6.Crochet Peek a boo Shirt ( one of my Fav's)
Supplies: Tshirt, crochet trim (a few yards)
I came up with this idea to make tight shirts wearable again. I had so
many cool tshirts yet most of them were purchased when it was trendy to
have them snug.
Measure the trim (you will do front to back).
Sew front to back right sides together.
Top stitch new side seam leaving armhole open.
I did this with fringe trim as well here.
****Also with this you could use a lace curtains, or table cloth!****
7. Make continuous Yarn from T-Shirt
99.Boots from old Sweater!
chopped off the sleeves, turned it inside out, and formed it to my foot.
Hot glued it to a shoe, like so...
flipped it right side out, and cut the bottom off the sweater to make a cuff..
Embroidered it..
Sewed it into a cuff that would flip out over the boot..
And now you have...Sweater boots!!
10. T-shirt totes
It's super easy to do! All you'll need is
an old cotton t-shirt, some sewing pins and thread, scissors- and
you're halfway there!
Cut off the sleeves and neck line t create your handles.
Pin and sew the bottom portion up.
Ok this was part one because there are so many more that we can do, so stay tuned I will be updating later today! :)
Talk to you Soon
Shana


No comments:
Post a Comment
Thanks for commenting, we love to hear from you!