Hello everyone I hope everyone is having a good week:) I want to introduce this weeks featured shop:PopTabiliciousDesiree's Jewelry, Beading & More! The owner and creator of PopTabilicious is Desiree, she is a kind and wonderful person along with the creative genius who has put a twist on Jewelry. I think it is fun and beautiful and I love that it is up-cycled. I will now let Desiree tell here story, so keep reading I hope everyone enjoys and don't forget to stop by her shop and pick up one of her wonderful pieces of jewelry:)
I have always been a creative person.
Ever since I can remember, if I saw something that I liked, I tried
to make it. I always made jewelry as a little girl. I would make
friendship bracelets, beaded jewelry and hemp bracelets and
necklaces. Last year I wanted to make some cool, new, funky bracelets
for my daughters. I decided to try pop tabs with yarn.
This is what I came up with:
From there, it was like a domino
effect. I just had to make more items with pop tabs! I thought, “Hey,
why don’t I try this with hemp?”. Using a macramé style, this is
what I came up with:
Then I tried different hemp colors and
cord sizes. I wanted to find styles everyone could enjoy.
I then started expanding to other
items, such as earrings and bookmarks:
I’ve also tried making napkin holders
as well! (This is still a work in progress).
Lately, however, I’ve been focusing
on a more elegant line of earrings and bracelets. These are done with
a new style of stitching with embroidery floss. It appears as
crochet, but actually I have no clue how to crochet! If you look
carefully, you can see the zig-zag detail I have worked into the
embroidery thread. You can find these items on my Etsy shop:
http://www.etsy.com/shop/PopTabilicious
My mind is always working on new ideas.
I hope that I can continue to create this jewelry for a long time.
Recently, my “tech” husband created a website for me! You can
find it here: www.poptabilicious.com.
We are still working out the details, and plan on adding a store in
the near future. With 2 kids and working other jobs however, this has
taken a little bit longer than I would like. I hope to have it fully
functional before the end of February!
I want to introduce to all you Rubbish fans a inspiration and a one of a kind Etsy shop.
This is Bella and in her shop, she sells handmade wire wrapped and one of a kind jewelry. One of the amazing aspects of her shop (Along with her beautiful Jewelry) is that she is only 13. You could never tell with her strong presence on Etsy,she is a professional and I can tell this is just the beginning for her.
Read more of her story below....
Here is a little about Bella and her Etsy Shop!
We wanted to know a little more about Bella and what got her started so here are the questions we asked and her responses,
What inspires you to do
what you do?
"I love to do
creative things, from drawing to making jewelry. I love to see a piece of wire
and a bead turn into a beautiful piece of jewelry!"
If someone was to ask
you, “Tell me all about your story, your life,” what would you
tell them? "I’m 13 and ever since I was a little girl I would make
jewelry. When I was 11 my family went to North
Carolina, we went to a shop in the mountains that
sold wire wrapped rings. I loved them and wanted to buy one but, I couldn’t
find one I absolutely loved. So my mom
said to me “you could probably learn how to make these yourself”. So that’s
what I did. I taught myself how to make the jewelry. I opened my shop October
16 2012. "
What is your driving
force...I know these questions may sound similar, but I really need
you to dig deep and get personal with your stories that will be
visible for your potential customers to read and comprehend.
"I love it
when I see people wearing and enjoying my jewelry. I just love to create! "
If you were to have a
brick and mortar shop (physical location), and a customer walked in
while you were there, what would you tell them about your featured
product(s) and/or product line?
"I have wire
wrapped rings and pendants, made out of 20 gauge silver/gold wire with a
colorful bead. I have colors from blue to red and green to purple. I have many
shapes and sizes for everyone and I make custom orders! Soon I will have more
products such as earrings and bracelets."
Why should customers buy
from you rather than from anyone else...what makes your product and
shop unique, maybe you do it differently or use different materials
to achieve the same look, or anything that sets your work apart?
"My Rings and
Pendants are made to last and if anyone finds a problem with anything I will do
whatever I can to fix it."
When did you start doing
what you do? Did it start as a hobby and move into professionalism?
"Well like I
said before I love to make jewelry so it was a hobby for me. My grandma sold
crocheted items on Etsy, and I thought what if I could sell on Etsy. So I asked
my mom and she thought it was a great idea, So now I sell on Etsy."
Who taught you how to do
what you do? Self taught...that's fine, tell me about your initial
studies into what you do, how long did it take you to learn it and
get where you are with it today? "I’m self
taught, and it took my about 4 days to get really good at making wire wrapped
jewelry. I looked up instructions how to make wire wrapped jewelry and
practiced until I got really good."
What I need you to do,
is think about your shop, if it had a window frontage, what
product(s) would you feature there in the window for all to see, and
how would they be displayed
"I
would have my blue wire
wrapped marble ring, and some other of my most popular ones displayed in a ring
box. "
Here are some images of Bella's beautiful jewelry:
Every so often I can go through my families and my own closet and find some stuff that I am tired of looking at, but instead of throwing them in that goodwill dumpster, or just throwing them away, I have compiled these tutorials so everyone can clean out there closets and revamp there old threads! I hope everyone enjoys and, let me know what kinds of tutorials you have tried!!
****Also I am looking for Guest bloggers to write on my Blog, if you are interested please email me
Rubbishlove22@gmail.com
<3 Shana
1. Diy Plant hanger from T-shirt!
2. Revamp those old Flip-flops 3.T-Shirt Backpack
Materials
T-shirt
Sharp scissors
Needle and thread
Large safety pin
Clothesline cord, about 6 times the width of the shirt
7/16-inch eyelet (or grommet) kit (see tip below)
Instructions
Turn the T-shirt inside out, then cut across the
shirt from armpit to armpit. You'll need only the bottom section.
Use the needle and thread to sew a simple stitch
across the shirt, about a half inch in from the cut edge, to seal what
will be the bottom of the bag.
Turn the shirt right side out. Snip the shirt's
hem almost all of the way through (do not cut any stitching) at the
midpoint between the two side seams. Attach a large safety pin to one
end of the clothesline cord. Feed the cord, safety pin first, through
the casing of the hem.
Follow the eyelet or grommet kit instructions to add eyelets to the bottom corners of the bag.
Thread the ends of the cord through the eyelet holes and double-knot them to secure.
Tips:
An eyelet or grommet kit can be purchased at craft stores or
online for around $15. In a pinch, you can cut the holes with scissors
and seal the cut edges with fabric glue, but the result won't be as neat
or as sturdy.
Due
to several questions about this tutorial, I decided to post an update
with more detailed steps. You can find the tutorial below:
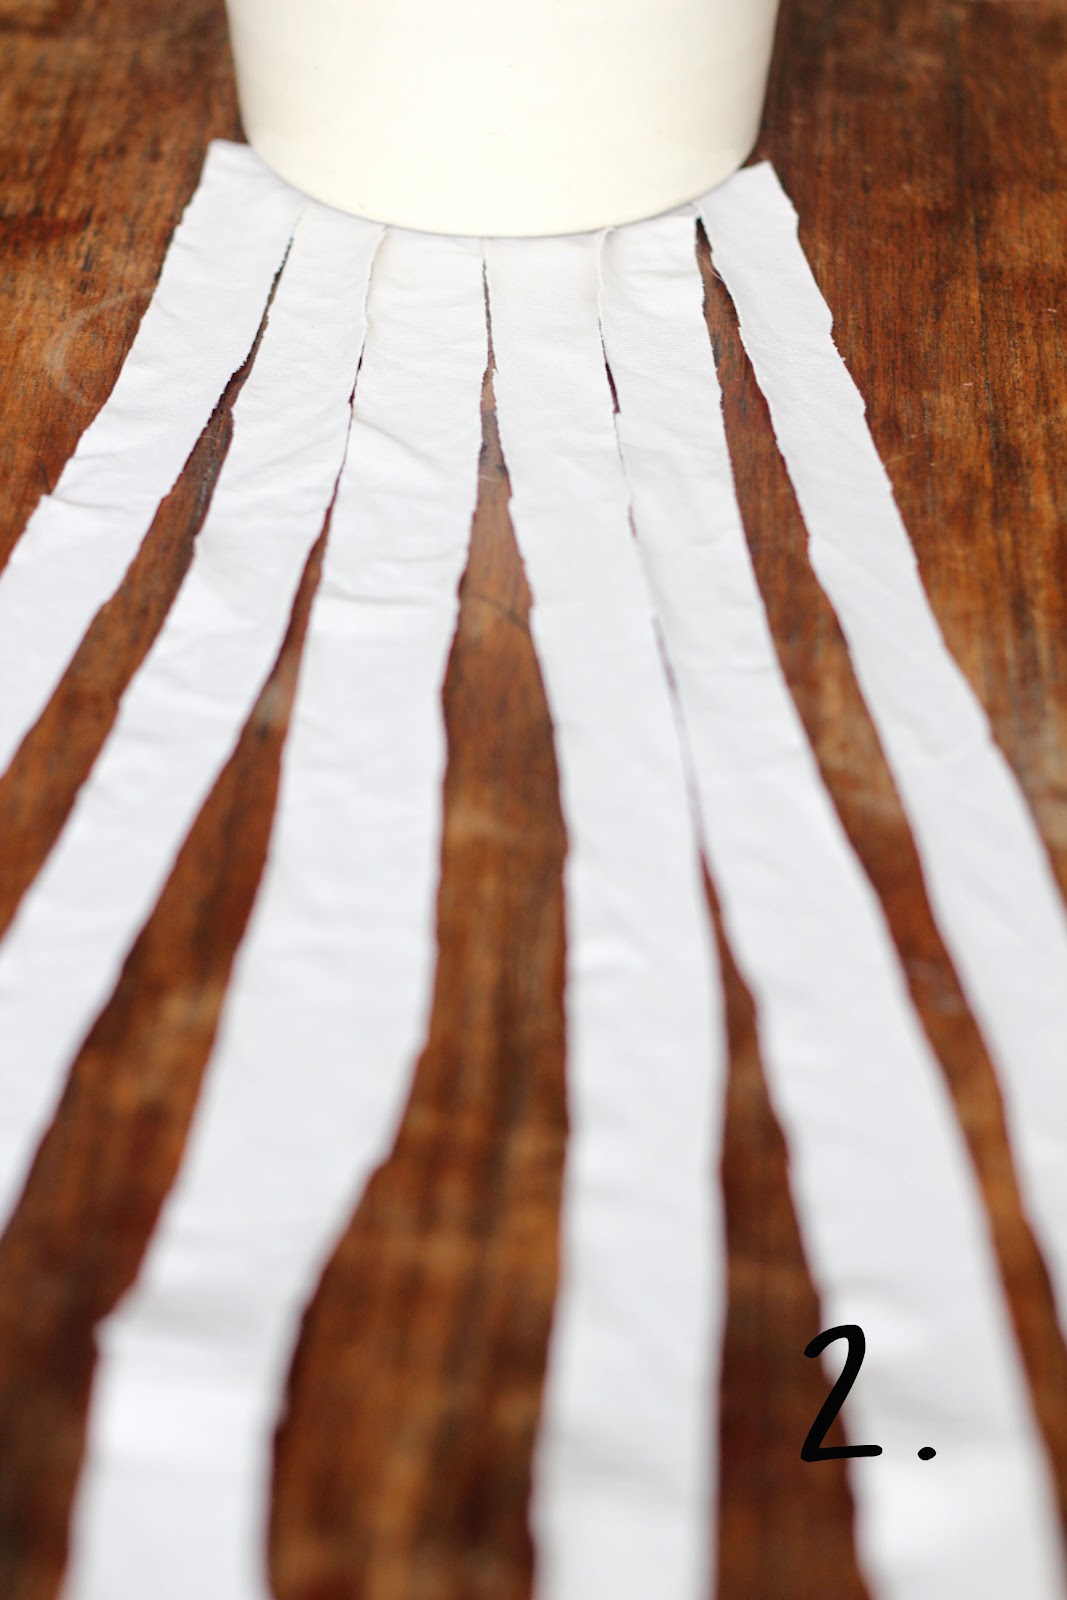
1. Take 6
pieces of fabric, mine are about 45 cm long and 1,5 cm wide. Place
something heavy on the toppart to keep them in place.
2. Take right strip and follow the red line in the picture.
3. It should look like this.
4. Take the left strip and follow the red line in the picture.
5. It should look like this.
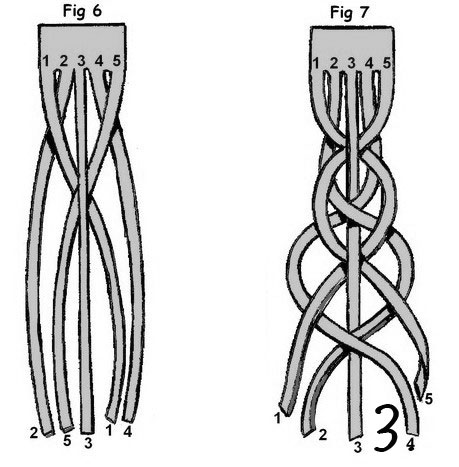
6. Now repeat steps 2 and 4. Pull on them, but not to tight!
7. Keep braiding until you have ure desired length.
8. Get you're glue gun or some textile glue and place a stripe of glue on top of the end. Do this on both sides.
9. Cut the fabric that is on the other side of the glue strip. Not the braided side!
10. It should look like this.
11. Put some glue on the outside of the braid, like shown in the picture.
12. Place the other outside against it and push them together until the glue has dried.
13. Measure the width of youre braid.
14. Cut a piece of fabric. The size should be 2x the width of your braid + 1 cm.
15. Fold the piece of fabric around the part where the bracelet is attached. And glue it together.
All done!
You can of course also sew the bracelet instead of using glue.
The bracelet will be easy to slide over you're hand, because the fabric is stretchy and soft.
5.Up cycle Bouquet 6.Crochet Peek a boo Shirt ( one of my Fav's)
Supplies: Tshirt, crochet trim (a few yards)
I came up with this idea to make tight shirts wearable again. I had so
many cool tshirts yet most of them were purchased when it was trendy to
have them snug.
Measure the trim (you will do front to back).
Cut side seams and sleeves off if you use a tshirt (here I used a tank).
Sew front to back right sides together.
Lay out and pin where you want the armhole to go.
Top stitch new side seam leaving armhole open.
I did this with fringe trim as well here.
****Also with this you could use a lace curtains, or table cloth!****
7. Make continuousYarn from T-Shirt
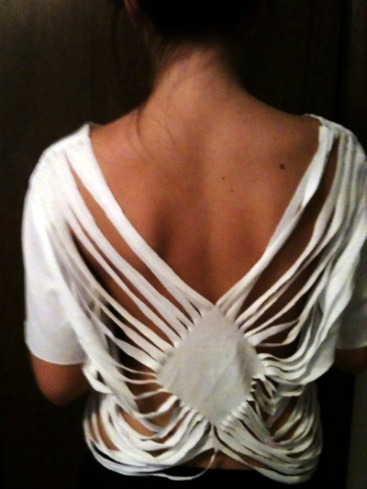
8. Sexy back T-shirt
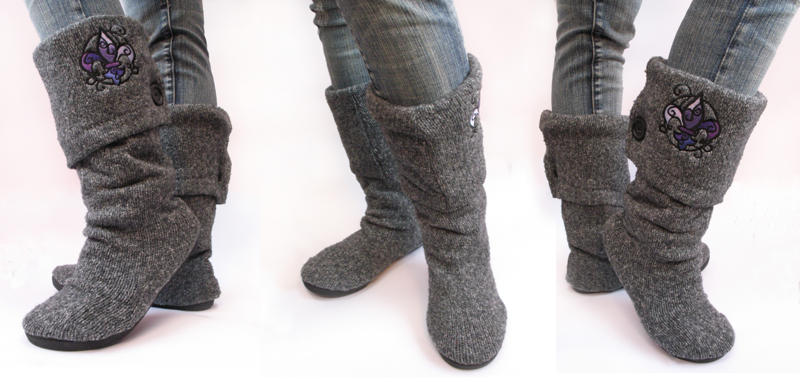
99.Boots from old Sweater! I started with this:
chopped off the sleeves, turned it inside out, and formed it to my foot.
Hot glued it to a shoe, like so...
flipped it right side out, and cut the bottom off the sweater to make a cuff..
Embroidered it..
Sewed it into a cuff that would flip out over the boot..
And now you have...Sweater boots!!
10. T-shirt totes
It's super easy to do! All you'll need is
an old cotton t-shirt, some sewing pins and thread, scissors- and
you're halfway there!
Cut off the sleeves and neck line t create your handles.
Pin and sew the bottom portion up.
Ok this was part one because there are so many more that we can do, so stay tuned I will be updating later today! :)


 Turn the T-shirt inside out, then cut across the
shirt from armpit to armpit. You'll need only the bottom section.
Turn the T-shirt inside out, then cut across the
shirt from armpit to armpit. You'll need only the bottom section. Use the needle and thread to sew a simple stitch
across the shirt, about a half inch in from the cut edge, to seal what
will be the bottom of the bag.
Use the needle and thread to sew a simple stitch
across the shirt, about a half inch in from the cut edge, to seal what
will be the bottom of the bag. Turn the shirt right side out. Snip the shirt's
hem almost all of the way through (do not cut any stitching) at the
midpoint between the two side seams. Attach a large safety pin to one
end of the clothesline cord. Feed the cord, safety pin first, through
the casing of the hem.
Turn the shirt right side out. Snip the shirt's
hem almost all of the way through (do not cut any stitching) at the
midpoint between the two side seams. Attach a large safety pin to one
end of the clothesline cord. Feed the cord, safety pin first, through
the casing of the hem. Follow the eyelet or grommet kit instructions to add eyelets to the bottom corners of the bag.
 Thread the ends of the cord through the eyelet holes and double-knot them to secure.