Thank you everyone who participated! The Winner is................. Elven Marie Johnson Everyone who entered I will send you a 15% off coupon to my Etsy store just for entering! I Thank you all so Much and please check back because are next giveaway will start in a few days! We will giveaways often and of course your daily dose of upcycled tutorials!!! Thanks agian <3 shana
Every so often I can go through my families and my own closet and find some stuff that I am tired of looking at, but instead of throwing them in that goodwill dumpster, or just throwing them away, I have compiled these tutorials so everyone can clean out there closets and revamp there old threads! I hope everyone enjoys and, let me know what kinds of tutorials you have tried!!
****Also I am looking for Guest bloggers to write on my Blog, if you are interested please email me
Rubbishlove22@gmail.com
<3 Shana
1. Diy Plant hanger from T-shirt!
2. Revamp those old Flip-flops 3.T-Shirt Backpack
Materials
T-shirt
Sharp scissors
Needle and thread
Large safety pin
Clothesline cord, about 6 times the width of the shirt
7/16-inch eyelet (or grommet) kit (see tip below)
Instructions
Turn the T-shirt inside out, then cut across the
shirt from armpit to armpit. You'll need only the bottom section.
Use the needle and thread to sew a simple stitch
across the shirt, about a half inch in from the cut edge, to seal what
will be the bottom of the bag.
Turn the shirt right side out. Snip the shirt's
hem almost all of the way through (do not cut any stitching) at the
midpoint between the two side seams. Attach a large safety pin to one
end of the clothesline cord. Feed the cord, safety pin first, through
the casing of the hem.
Follow the eyelet or grommet kit instructions to add eyelets to the bottom corners of the bag.
Thread the ends of the cord through the eyelet holes and double-knot them to secure.
Tips:
An eyelet or grommet kit can be purchased at craft stores or
online for around $15. In a pinch, you can cut the holes with scissors
and seal the cut edges with fabric glue, but the result won't be as neat
or as sturdy.
Due
to several questions about this tutorial, I decided to post an update
with more detailed steps. You can find the tutorial below:
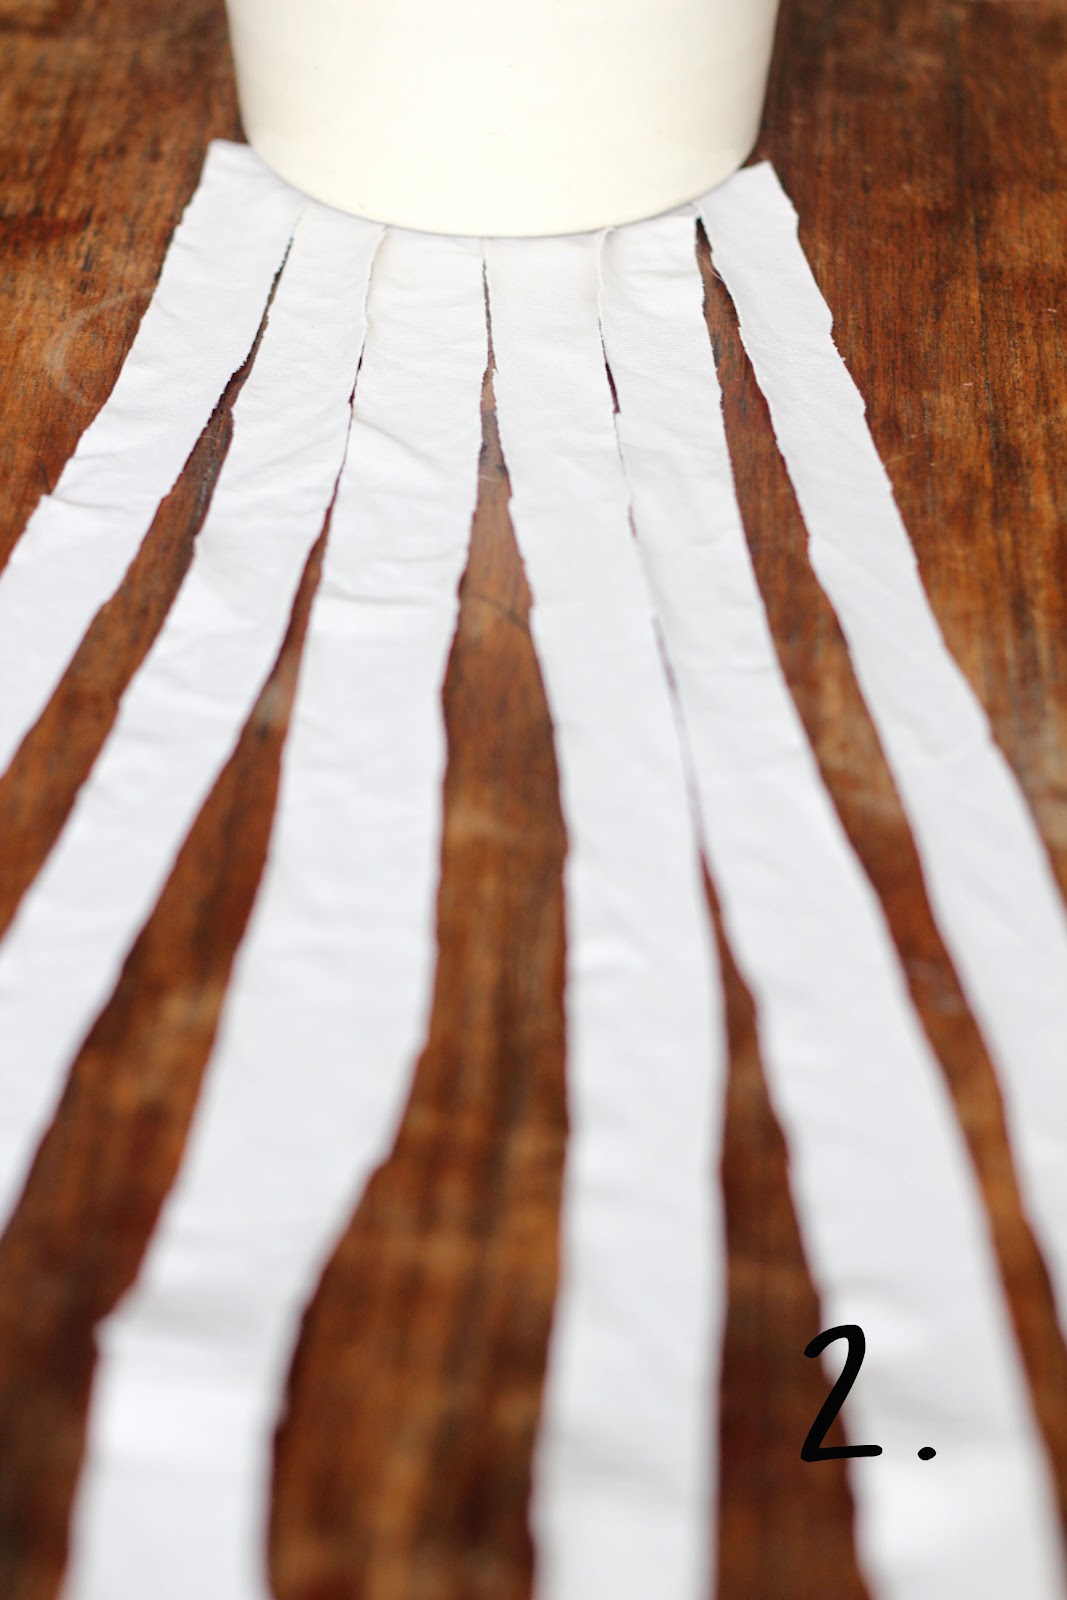
1. Take 6
pieces of fabric, mine are about 45 cm long and 1,5 cm wide. Place
something heavy on the toppart to keep them in place.
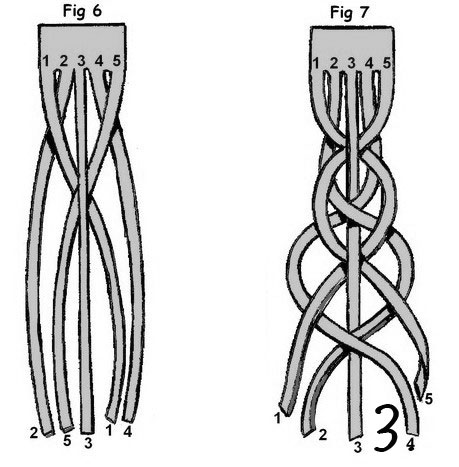
2. Take right strip and follow the red line in the picture.
3. It should look like this.
4. Take the left strip and follow the red line in the picture.
5. It should look like this.
6. Now repeat steps 2 and 4. Pull on them, but not to tight!
7. Keep braiding until you have ure desired length.
8. Get you're glue gun or some textile glue and place a stripe of glue on top of the end. Do this on both sides.
9. Cut the fabric that is on the other side of the glue strip. Not the braided side!
10. It should look like this.
11. Put some glue on the outside of the braid, like shown in the picture.
12. Place the other outside against it and push them together until the glue has dried.
13. Measure the width of youre braid.
14. Cut a piece of fabric. The size should be 2x the width of your braid + 1 cm.
15. Fold the piece of fabric around the part where the bracelet is attached. And glue it together.
All done!
You can of course also sew the bracelet instead of using glue.
The bracelet will be easy to slide over you're hand, because the fabric is stretchy and soft.
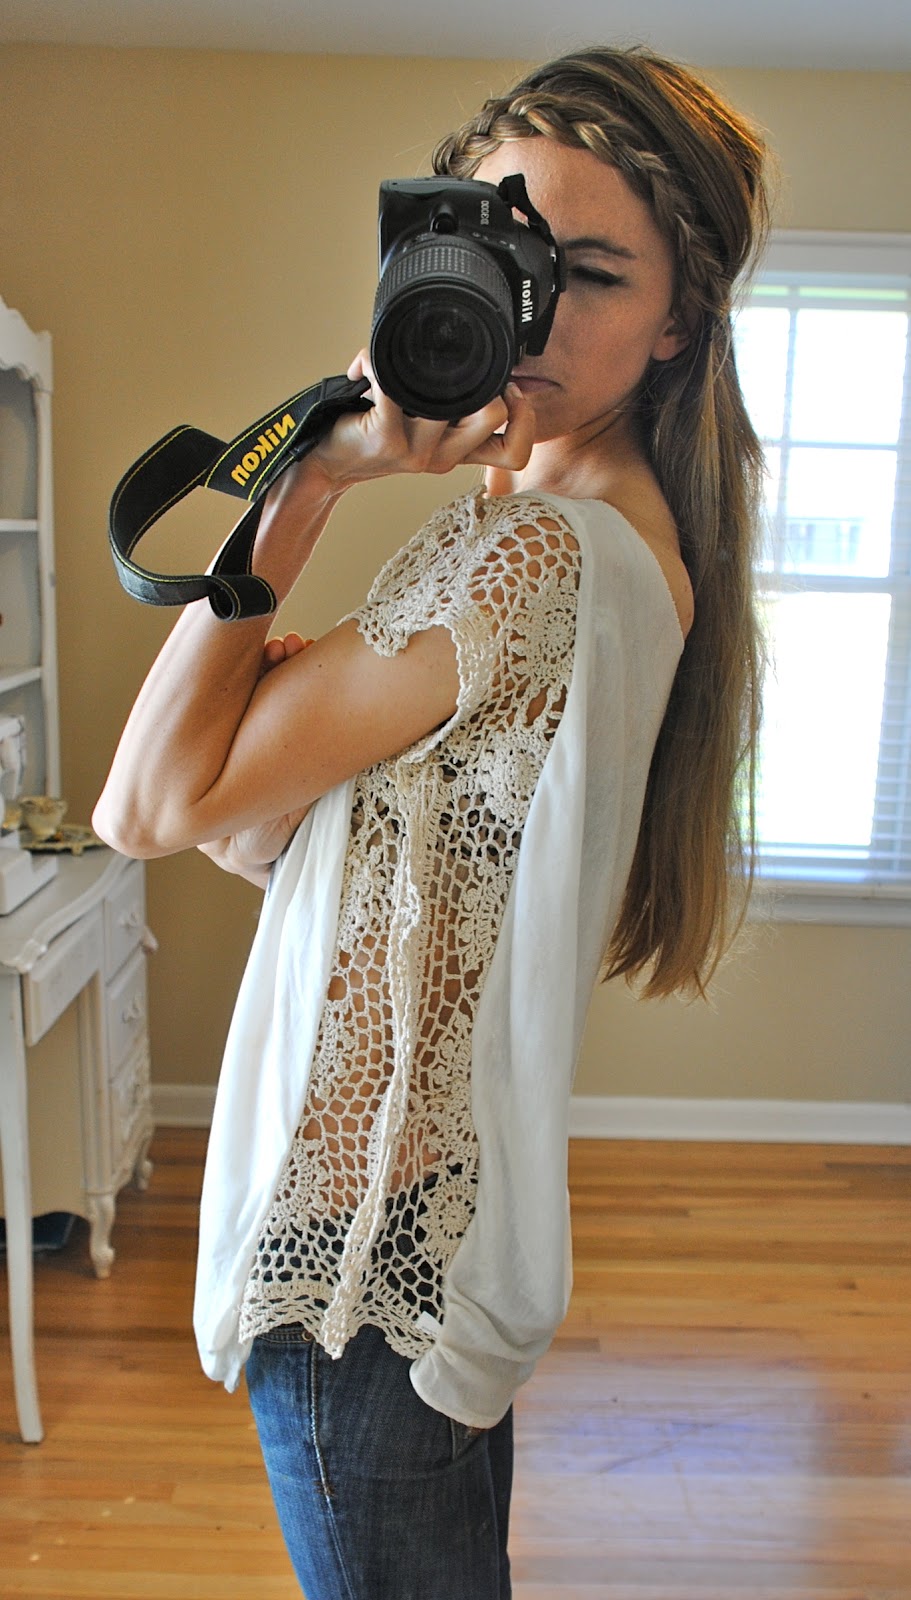
5.Up cycle Bouquet 6.Crochet Peek a boo Shirt ( one of my Fav's)
Supplies: Tshirt, crochet trim (a few yards)
I came up with this idea to make tight shirts wearable again. I had so
many cool tshirts yet most of them were purchased when it was trendy to
have them snug.
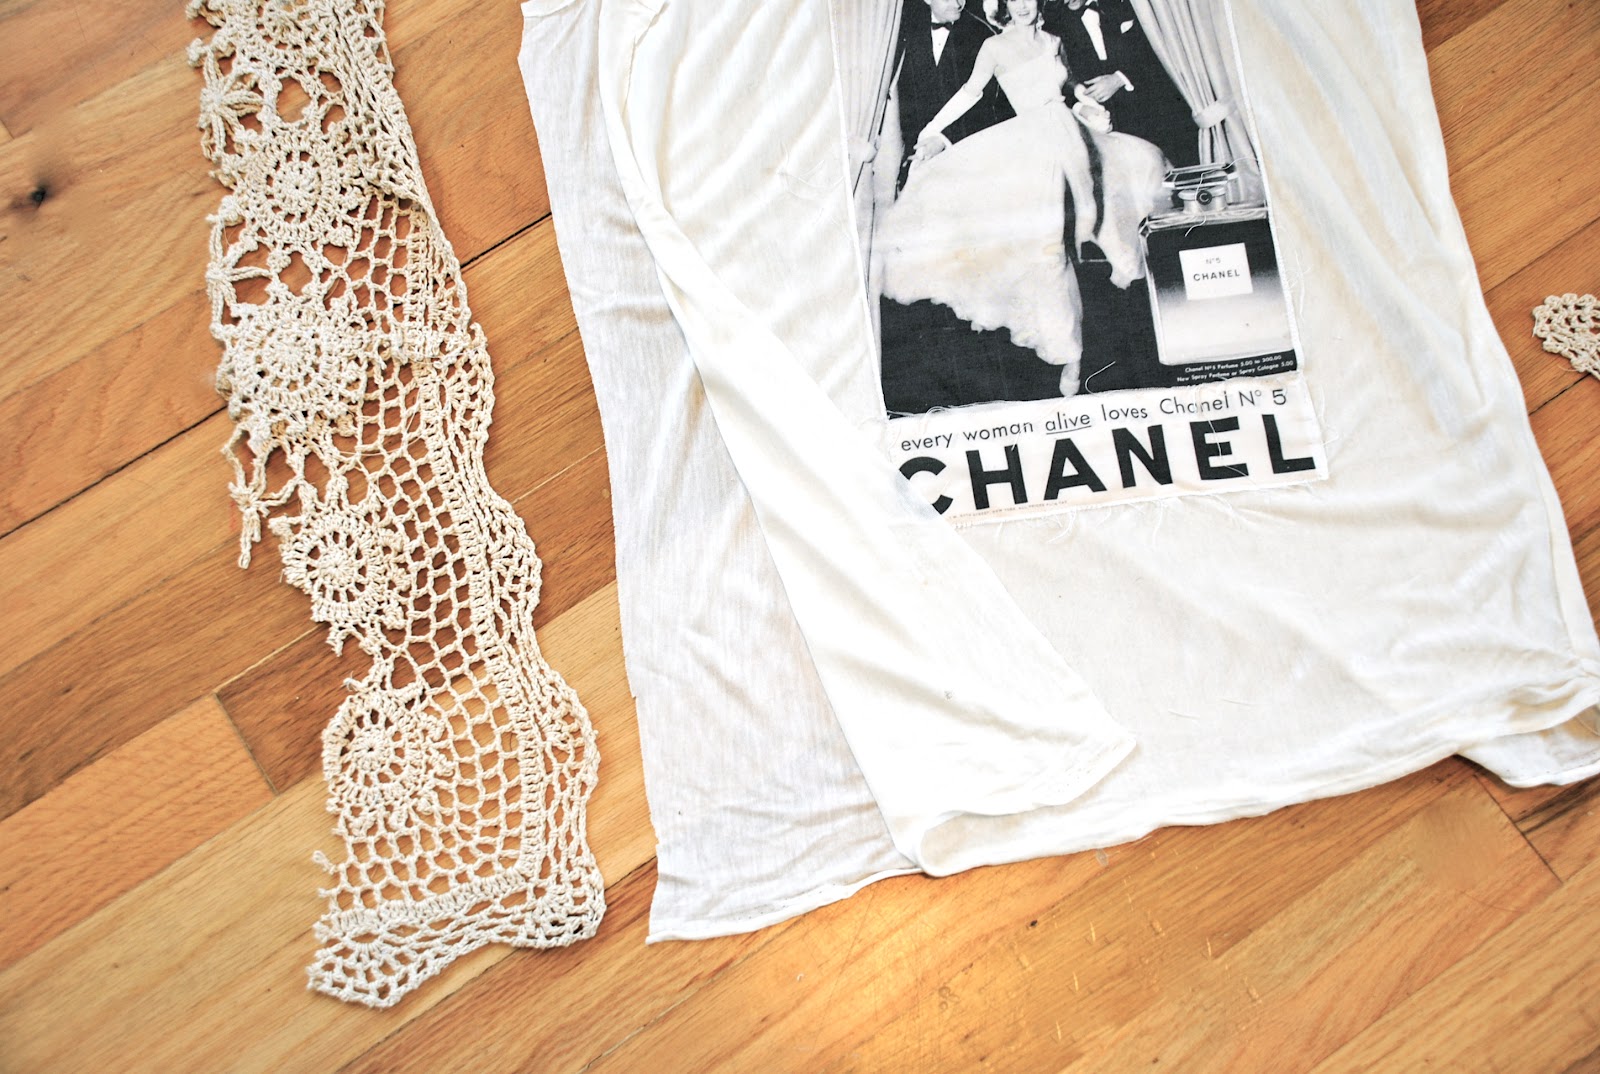
Measure the trim (you will do front to back).
Cut side seams and sleeves off if you use a tshirt (here I used a tank).
Sew front to back right sides together.
Lay out and pin where you want the armhole to go.
Top stitch new side seam leaving armhole open.
I did this with fringe trim as well here.
****Also with this you could use a lace curtains, or table cloth!****
7. Make continuousYarn from T-Shirt
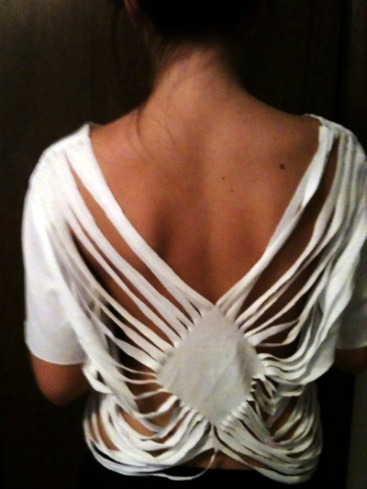
8. Sexy back T-shirt
99.Boots from old Sweater! I started with this:
chopped off the sleeves, turned it inside out, and formed it to my foot.
Hot glued it to a shoe, like so...
flipped it right side out, and cut the bottom off the sweater to make a cuff..
Embroidered it..
Sewed it into a cuff that would flip out over the boot..
And now you have...Sweater boots!!
10. T-shirt totes
It's super easy to do! All you'll need is
an old cotton t-shirt, some sewing pins and thread, scissors- and
you're halfway there!
Cut off the sleeves and neck line t create your handles.
Pin and sew the bottom portion up.
Ok this was part one because there are so many more that we can do, so stay tuned I will be updating later today! :)
When I was an undergrad in college, I often found myself wishing that
design blogs and magazines had decorating tips for my particular
lifestyle. That lifestyle being living with no money in a veritable shoe
box with poor air conditioning, loud neighbors, communal bathrooms and a
suspicious smell. Although I perused various design websites on a daily
basis, bookmarking things for my future “dream home,” I couldn’t find
things to use in the present moment, things that would help me transform
my decrepit cinderblock dorm room into something even remotely homey.
So all you freshman design aficionados and first-time renters with
work-study jobs: This series is for you. Over the next several weeks,
this column will feature cheap, quick and shockingly easy tips for
brightening your dorms, apartments and general student life. Horrible
posters and ratty dorm furniture be gone — Design*Sponge is going to
college!
Our first DIY is sure to brighten up your midterm study sessions!
Dorm rooms can be pretty depressing places, but even they can be made
magnificent and regal with the right touch — like a shimmering chandelier (that
happens to be made out of metal clothes hangers and duct tape).
Although we would never encourage purchasing wire hangers (haven’t you
seen Mommie Dearest?),
sometimes you just end up with one — or several hundred. If this is the
case, you’ve already got most of the supplies for this low-budget
project! So get the rest of your supplies together and join us after the
jump! — Max
Alright, now that you’ve gathered your supplies — many of which you
probably already had (isn’t decorating fun?) — it’s time to start! Here
are the directions:
1. Take your wire hangers and, one at a time, unwind the hook section
so that it’s completely separated. With two pliers (or your hands if
you’re Superman), straighten the bends in the wire by holding a plier at
either side of the bend and bending in the opposite direction.
2. Once each of the 10 hangers is completely unwound and
straightened, bunch them so that all of their hooks are together and
pointing in the same direction.
3. Holding your bunch of wires in place, start rolling strips of duct
tape around the bunch, beginning near the hooks. Work your way down
until about 1/2 of the wire bunch is covered in duct tape. We used
alternating strips of neon pink and metallic silver tape for some added
snazziness. Colored duct tapes can usually be picked up at any art,
craft supply or hardware store.
This is kind of what it should look like at this point (minus the string lights — we’re not there yet):
4. Now, take 5 of your wires and bend them so that they curve gently
upward. This will be the first tier of your chandelier. If your wires
are looking freakishly long and this isn’t to your liking, use a wire
cutter or the wire cutter section of your pliers to trim off the excess.
5. With the 5 remaining unbent wires, continue duct taping for about another 6 inches (give or take, no need to be precise).
6. Bend the rest of the wires upward in a similar fashion. Position
the bent wires so that each is pointing in a different direction around
the circumference of the wire bunch.
This is kind of what it should look like at that point:
Admittedly, it will look like a wonky Dr. Seuss contraption at this point, but have patience! You’re almost done!
7. Take all of the light bulbs off your string lights and place them
in a bowl or similar vessel. This step is incredibly important if you
don’t want to end up sweeping broken glass all night long when you
should be doing homework. Or partying.
8. Tape the side of the cord with the two-pronged plug near the top of your chandelier.
9. Spiral the cord down along the shaft of the chandelier until you
reach your first tier. Then wind the cord around each wire of the tier,
to the tip and then back to the center. You can hold the lights in place
by using the clips that are often attached t0 each light. Repeat on the
second tier, then hide the plug somewhere in the middle.
10. Put the light bulbs back on!
11. All that’s left is to hang that thing! Screw a simple ceiling
hook (available at most hardware stores) into your ceiling to latch the
hooks onto. Then plug your extension cord into the lights and run it
along the ceiling and wall with some of your handy-dandy duct tape!
12. BAM! DONE! INSTANT CLASS! Now it’s time to impress all your roommates and friends with your ultra-swanky chandelier!


 Turn the T-shirt inside out, then cut across the
shirt from armpit to armpit. You'll need only the bottom section.
Turn the T-shirt inside out, then cut across the
shirt from armpit to armpit. You'll need only the bottom section. Use the needle and thread to sew a simple stitch
across the shirt, about a half inch in from the cut edge, to seal what
will be the bottom of the bag.
Use the needle and thread to sew a simple stitch
across the shirt, about a half inch in from the cut edge, to seal what
will be the bottom of the bag. Turn the shirt right side out. Snip the shirt's
hem almost all of the way through (do not cut any stitching) at the
midpoint between the two side seams. Attach a large safety pin to one
end of the clothesline cord. Feed the cord, safety pin first, through
the casing of the hem.
Turn the shirt right side out. Snip the shirt's
hem almost all of the way through (do not cut any stitching) at the
midpoint between the two side seams. Attach a large safety pin to one
end of the clothesline cord. Feed the cord, safety pin first, through
the casing of the hem. Follow the eyelet or grommet kit instructions to add eyelets to the bottom corners of the bag.
 Thread the ends of the cord through the eyelet holes and double-knot them to secure.